Wednesday, December 28, 2011

Secret Santa & Stripes/Gingham OOTD

The always stylish Jessy of The Little Dust Princess organized a Secret Santa exchange for the petite community and I was excited to join in this year.  Thank you Jessy for putting this all together!  My Secret Santa was Cynthia of Shorty Stories - make sure to check out her blog, one of the older petite blogs out there.

My goodies from Cynthia included Almay makeup eraser sticks, Burt's Bees lip balm, and a pretty beaded bracelet.  Thank you, Cynthia!  This is perfect!  I haven't tried the eraser sticks yet but they'll be great for on-the-go raccoon eye fixing and the lip balm gives just the right amount of color without any stickiness.

In case you're wondering, I drew Lor from Petite in the City.  Check out her blog if you'd like to see what I got her :)

I also received some goodies from Jean of Extra Petite and Annie of Really Petite.  These beautiful ladies have amazing blogs (the first ones I started following) and were among the first to welcome me to the blogging community.  Thank you gals for being so sweet and thoughtful!  <3

Beauty goodies (can't wait to try them!) and trim for Baby / Toddler crafting projects (perfect for my scrapbooking and shadow boxes!) from Jean.


A beautiful orange striped LOFT sweater from Annie (it was like she read my mind - stripes AND orange!) that I wore the first chance I got :)
Sweater:  LOFT Stripe Button Down Back Sweater, XSP, gift from the lovely Annie
Shirt:  J. Crew Crewcuts Boys' Button-Down in Large Gingham, Sz 14
Necklace:  J. Crew Resin and Chain Link Necklace, Navy Blue
Skirt:  J. Crew Bell Skirt, Sz 2
Shoes: Tory Burch Afrikan Reva Ballerina Flat in Razor Blue

I forgot to take a picture of my bag with the outfit!  This is a late birthday present from Hubby (not his fault, I took 2 months trying to figure out what I wanted) - a Rebecca Minkoff MAC Clutch in Stone with gunmetal hardware.  I LOVE it!  It is the perfect size for toting around my essentials and can be carried cross-body - a must for coordinating the kiddos.

If you're wondering how the Revas are doing in my breaking in process, I found the perfect shoe stretchers on accident last week.  Cardboard inserts that came with my Dansko clogs!  My problem areas are the back elastic and the pinky toe area.  This insert is helping stretch those for me and it's making a big difference.


Whew, that was a long post from me :)  Hope everyone has a wonderful and happy new year!!

Sunday, December 4, 2011

(CLOSED) GIVEAWAY: Hand-Knit Chunky Scarf

The winner is WHW Katelyn!  Please contact me within the next few days to claim your prize - congrats!!

.I've been trying my hand at knitting recently because it's a good craft for my current lifestyle.  I can sit on the couch with the kiddos and knit with just a few materials.  I'm very much a newbie and am still trying to figure things out but I was very flattered last week when some of you expressed interest in my knitted scarf.  So it's time for another giveaway!

 The winner can choose from the Buttoned Wrap Scarf or the Slouchy Cowl (both are wool blends in case anyone has sensitivities):
Buttoned Wrap Scarf in Spice (an orange-red color)

Slouchy Cowl in Charcoal Gray

To enter, just leave a comment for each of the following:

  1.  Publicly follow this blog (click "follow" in my sidebar) and let me know which style you'd like
  2. (Optional Bonus Entry) Follow me on Twitter (click "Twitter" on sidebar and follow)
  3. (Optional Bonus Entry) Click to tweet and leave me your Twitter ID

The winner will be randomly drawn on December 31st and will have 2 days to claim their win.  If unclaimed, another winner will be drawn.

Good luck!

Sunday, November 13, 2011

GIVEAWAY: Allison Izu Premium Denim

The giveaway is now closed - the winner is Thu!  Congrats and send me an email to claim your prize!

Shopping for jeans has always been a bit of a nightmare for me.  Being 5'2" with a 27" inseam often meant that I had to hem every single pair.  But then it seemed like the proportions were wrong.  The thigh / knee area was always off and I hated that self-hemming my jeans meant that the hem didn't have the faded pattern (see Kelly's post here on original vs. regular hemming on jeans) that regular jeans had.

"To hell with hemming!"

Allison Izu, a denim brand specifically catering to petites (that is women 5'6" and under), not only offers a variety of sizes / inseams, they have also solved the problem of proportions.  The waist-hip-knee-ankle ratio as well as other denim details are now proportioned for petite figures.  See Allison Izu denim reviews from Extra PetitePetite Little Girl, and Really Petite.


Now on to the fun part - win a pair of Allison Izu Premium Denim with the size and style of your choosing!

The winner will be randomly drawn on December 4th and will need to contact me within 2 days to claim their prize.  If unclaimed, another winner will be drawn.

To enter, please leave a separate comment for each of the following:
  1. Visit the Allison Izu website and let me know which style is your favorite
  2. (Optional Bonus Entry) Publicly follow this blog (click "follow" in my sidebar)
  3. (Optional Bonus Entry) Click to tweet and leave me your Twitter ID
Good luck!

Wednesday, November 9, 2011

Jewelry DIY: Ode to Pearls

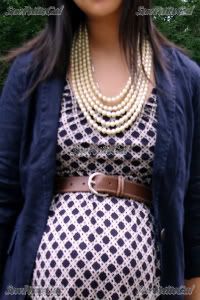
I've always been in love with pearls and incorporate them into almost every piece I make.  This one is my ultimate pearl piece with 5 strands of ivory nugget pearls to add a little bit of drama to every ensemble.


It winds up being a rather heavy piece as I prefer glass to plastic materials but I like the end result.  As you can tell, I made this piece right before DD was born :)

I'm also experimenting with less traditional pearl necklaces like these ladder necklaces:


And finally, I've been wanting to create a chevron necklace.  I think this one is "getting there" but still needs some work:

In other DIY jewelry news, I'm working on some bracelets but I'll save those for a later post :)

What type of jewelry are you most drawn to?  Chains?  Pendants?  Beads?  A mix?

Sunday, November 6, 2011

Sweatshirt to Tote Bag Easy DIY Tutorial

I've been aching for some DIY time and finally pieced together enough kiddie naps to finish something :)  (BTW, don't get me wrong.  I adore my children with every part of my being but I have a bunch of DIY ideas bubbling in my brain and love it when I get the time to see one through).  This one is a result of a closet cleaning.  I found an old sweatshirt from Old Navy that I haven't worn in ages and I thought it would make a cute striped tote bag.

This is the finished tote.

See tutorial after the jump!

Thursday, October 13, 2011

Triple Row Leather Bracelet DIY Video Tutorial

I received a reader request on how to create a multi-row beaded leather bracelet similar to the tutorial for the Leather Wrap Bracelet here.  The instructions are similar with just a few modifications - see below for materials and video.


What I used (materials can be purchased at most hobby stores like Michael's):
  • 40 inches of 1 mm leather cord
  • Beads 
  • Size D Nymo thread
  • Beading needle (personally I use a floss threader because I like that it's flexible without getting warped in the beading process - also any size thread will fit easily in the loop)
  • Beading glue (I use super glue because the bead glue I have turns white and crusty when dry)
  • Button with 2+ holes (needs to fit 2 mm cord, look for spare buttons around the house)


Questions?  Just leave it in the comments and I'll get back to you :)

Sunday, October 2, 2011

The Story of Baby Girl

Playing the waiting game towards the end of my pregnancy seemed like it dragged on forever but now that it's over - it seems like it all happened so fast!  The fastest part was actually my labor.  Late in the afternoon on 9/15, I felt a hard kick similar to what happened right before my water broke with my son.  I called my husband to come home just in case and he took me to the hospital.  Baby Girl must have known that we had arrived because before we could even get to labor and delivery, she was born right in the hospital elevator!  I'm glad my instincts kicked in to tell me to "catch" my own baby because it took another 5-10 minutes afterwards to get medical assistance.  All of this happened during the course of 1 hour!!  For reference, labor with my son was 8 hours so I was thinking Baby Girl would take 4-5 hours (typically half the time of your first pregnancy).

Aside from a little jaundice and being a bit cold, my little peanut was nice and healthy - weighing in at 6 lbs, 15 oz and measuring 19.5" long.  She is now a little over 2 weeks old and I got to break confinement briefly yesterday to get some newborn portraits taken.  Here are 2 of my favorites:


Thanks again to everyone for all the kind comments!  I've been trying to sneak in some blog loving time here and there so I'm still sporadic but I love seeing everyone's posts :)

Sunday, September 25, 2011

Vintage Inspiration: DIY Crocheted Collar

A quick "hi" from maternity blogging hiatus:  Thank you everyone for the kind words and best wishes!   I'm truly touched and appreciative of all of them!  Baby Girl is proving out to be quite the night owl where peak wakefulness is 12am-3am :) but everything is going well.  Before I pop back into hiatus, I wanted to share one of the posts I prepared before her arrival:

----------------------------------------------------
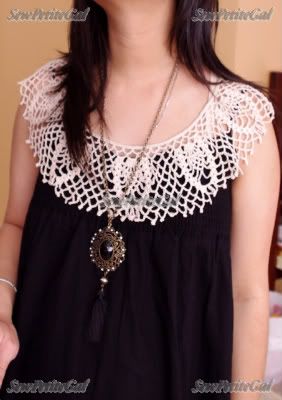
So my mom is pretty much the most awesome person I know.  She sews, knits, crochets, is a fabulous cook, AND helps me take care of the little one when Hubby and I work.  I've been seeing dramatic, embellished collars in the mags lately and when I told Mom about it, she offered to not only crochet me a collar, but also TEACH me how to crochet.  We're waiting until I start maternity leave to really dive in but for now, I can crochet a mean straight line LOL.

The great thing about the collar is that it is interchangeable and can be added to any kind of ensemble.


Collar:  DIY (courtesy of Mom)
Necklace:  F21
Dress:  H&M Maxi Skirt worn as dress
Shoes:  Born Leather Slides (you may have noticed that I'm all for comfy flats now)

A closer view of the collar

What do you think?  There may be future crocheted items making their way to my Etsy store soon :)

Monday, September 19, 2011

Baby Girl is Here!

As you've probably figured out, the lack of posts has been because Baby Girl arrived on Thursday!  Details to follow (like how I delivered my own baby - but not graphic details!) but we're back home from the hospital and everyone is doing well.  I have a couple of posts that I never had a chance to schedule that will get published.  Meanwhile, as I get settled in with our new arrival, please bear with me as I go on maternity hiatus :)

Much love to everyone and will return soon!

Sunday, September 11, 2011

Preggy Chronicles Vol. 4: Dressing for Every Trimester

I'm in the home stretch!  I'm full term and pretty much ready to go whenever Baby Girl would like.  I know some of you have been with me since the beginning but I wanted to do one big post on what you can wear for your entire pregnancy with tips for every trimester.

I'll first say that everyone is different.  I started to develop a baby bump VERY early on (partially because I went on a food free-for-all the moment I found out I was pregnant) and needed to hide it (see belly-hiding tips here) from my coworkers until I was ready to announce my news.  After that, I was able to flaunt my bump :)  Despite this baby bumpitude, I was able to primarily wear normal non-maternity wear except maternity pants in the 3rd trimester.  Underneath every picture is a description of what worked for me plus a link to the original post so you can see the outfit details.

1st Trimester:
1.  Loose wovens mask bellies with volume.  Wear skinny bottoms to offset the flowiness.
2.  Dresses that cinch the natural waist and then flare out also work.
3 & 5.  Tucking a blouse helps define your figure while the fluffing hides any tummy pouches.
4.  Placing your skirt waist directly on the most protrusive part of your bump helps smooth it out.


1. Loose Woven 
Top
(link)
2. Cinched Waist 
w/ Flared Skirt
(link)
3. Tucked / 
Fluffed Blouse +
Blazer
(link)
4. Strategic Skirt
Placement
(link)
5. Tucked / Fluffed 
Blouse + Blazer
(link)

2nd Trimester:
6.  Once your tummy is officially ready to make its debut - start flaunting it with belting at the empire waist.
7.  Make use of your normal pants by pairing it with a Bella Band (essentially keep your pants undone and the stretchy band will keep it up!) and of course voluminous tops still work.
8.  Elastic-waist skirts are your best friend and you can wear them in every trimester either above, on top of, or beneath your bump.
9 & 10.  Stretchy dresses are super comfortable and allow your belly full freedom :)  Add a belt for more figure definition.


6. Empire Belting
(link)
7. Bella Band +
 Flowy Top
(link)
8. Elastic-Waist
Skirt
(link)
9. Stretchy Dress 
+ Empire Belting
(link)
10. Stretchy Dress
(link)

3rd Trimester:
11.  Maxi dresses are PERFECT for pregnancy.  Most are built with an empire waist so feel free to buy your normal pre-pregnancy size and rock them both during your pregnancy and afterwards too.  Need I say more about belting?  :)
12 & 13.  Stretchy tops + maternity bottoms make for an easy way to wear separates if you are more a pants-type of gal.
14.  Stretchy top + elastic-waist skirt.  Get some mileage out of your existing normal clothes!
15.  Stretchy dress - same kind of deal here :)


11. Belted Maxi
(link)
12. Stretchy 
Top + 
Maternity Pants
(link)
13. Stretchy 
Top + Blazer + 
Maternity Pants
(link)
14. Stretchy Top + 
Elastic-Waist 
Skirt
(link)
15. Stretchy Dress
(link)

Shoes:  Starting in the 2nd / 3rd trimester, I tended to favor comfy shoes over cute shoes (though I still took photos with the cute ones!).  Flats are probably the shoe of choice since they are both work appropriate and comfortable.  I also love my sandals (particularly shorter platforms since they allow me to stay balanced and don't pitch my weight forward) because they never feel tight on my sometimes swollen feet.  I will add here that I primarily work at my desk and do not need to move around very much.  When I do, I have a pair of extra shoes in my desk to slip on.

All Other Accessories:  Go bold and have fun here!  You have absolutely no restrictions.

Whether or not you decide to go with maternity wear, just be comfortable!  There are no rules so make your own as you go.  I hope this post was helpful :)

See previous Preggy Chronicles here:


Of course, can't have a post today without pausing in remembrance of 9/11...

Friday, September 9, 2011

Guest Post on Gigi's Gone Shopping

While Gigi is taking care of more important things (i.e. Baby G!), I guest-posted the 5 things I'm most looking forward to this fall in her Fall Fab 5 feature.  Go check it out here!


Are you looking forward to fall?  Any fall items in particular that have caught your eye?

As for me, no baby yet.  I'm still mostly resting and taking it easy, but the car is now packed up with baby essentials and my hospital bag  :)  Once Baby Girl arrives and is settled, I want to make her a leopard cape (sold out already at Baby Gap) and matching little purse - I am super excited on all the future Baby Girl projects!!

Baby Gap Leopard Satchel Bag (buy here)
Baby Gap Leopard Print Cape (sold out in US, but still available in Canada)

Have a wonderful weekend everybody!

Sunday, August 28, 2011

DIY Fuchsia + Gray Bow Neck Dress

Quickie post today: I'm still obsessed with color blocking though this one is much more mild - incorporating fuchsia with a medium gray.

Dress:  Fuchsia + Gray DIY Bow Neck Dress
Belt:  J. Crew Factory Metallic Webbing Belt
Shoes:  Talbots Flower Bouquet Ballet Flats, Gray Flint
Sunnies:  Michael Kors
Bag:  Balenciaga Twiggy, Anthracite

A closer view

I used this tutorial to make the dress (2 rectangles of 25 x 33") and then just added a gray border and sash.  What do you think?  I love the giant bow :)

Sunday, August 14, 2011

DIY Colorblocked Maxi Dress OOTD

Remember my t-shirt to colorblocked maxi dress tutorial a little while ago?  Some of you asked to see what it looked like on me and of course I had to oblige :)

Dress:  DIY Striped Colorblock Maxi Dress
Necklace:  DIY Looped Rope Necklace
Belt:  Lands End Nautical Rope Belt
Shoes:  THE comfiest sandals in the world!  I bought these ~15 years ago and have been wearing them every single summer.  They are so old that I can't even tell what brand or size they are anymore.
Sunnies:  Gucci


 The perfect thing about a t-shirt dress is the ability to either look "normal" or s-t-r-e-t-c-h to accommodate my baby bump :) 

Sunday, August 7, 2011

45 Min. Colorblocked T-Shirt Dress DIY Tutorial

After seeing this Petit Bateau t-shirt dress in the pages of In Style, I became inspired to do a variation of my colorblocked maxi dress.  And this one went by much quicker, only 45 minutes from beginning to end!  The great thing about this is that you don't have to do any hemming / making sleeves / finishing the collar because you're using all pre-existing materials that come with these components finished!


Petit Bateau Short-Sleeved Tee Dress
(currently sold out, but see link here)
My DIY version - Aqua, Pink Coral,
and Black

See tutorial after the jump:

Thursday, August 4, 2011

Make Your Own Stripes Colorblocked Maxi Dress Tutorial

Does hubby / boyfriend / dad / brother have a bunch of old t-shirts they don't want anymore (or ahem, won't notice if you take)?  Here's an easy way to get another round of use out of them!  I used 3 t-shirts and some scrap knit fabric to create a striped colorblock maxi dress.  I've been in love with the combination of grays and yellows for a while but it is so HARD to find fabric that uses these colors.  Rather than continue my search, I decided to make my own "fabric."  :)

DIY Striped Colorblock Maxi Dress
DIY Looped Rope Necklace

See tutorial after the jump :)

LinkWithin

Related Posts Plugin for WordPress, Blogger...