Sunday, June 29, 2014

Wednesday, June 25, 2014

30-minute Removable Headboard Cover DIY Tutorial

I can be a bit fickle and love to experiment around with different things.  As such, I am particularly partial to impermanent items - removable peplums, reversible dresses, and now a removable headboard cover.  Making one is not only simple, but quick as well.


Difficulty: Easy

Time: ~30 minutes

Materials: ~2.5 yards of fabric (easiest if width is 55-60") for a King-sized headboard

Since this is picture-heavy, please see the rest of the tutorial after the jump.

Sunday, June 22, 2014

DIY Headboard Slipcover Preview

Am still pondering if this is the look I want, but slipcover #1 is finished!

UPDATE - Tutorial here

DIY Headboard Slipcover (tutorial here)
DIY Bedskirt (here)

Wednesday, June 18, 2014

DIY Foaming Soap

This has zero to do with sewing or food, but it is an easy home DIY that I got a kick out of and wanted to share.  :)

Our family is in love with foaming soap.  Somehow, regular soap now feels sticky and inefficient (I know we're crazy).  I used to buy large containers of cheap refills, but with our smaller living space, it seemed like it was eating up too much room.  And being weirdly picky, I wasn't as keen on the bright orange color layered with the generic scent.  Google to the rescue!

Used recipe on Food.com to combine dish soap with water in our existing soap pump.
(Side note - this teeny tiny tile in the bathroom is on its way out in our upcoming bath remodel.  The grout is a nightmare to clean.)

Given all the varieties of dish detergent out there, you can have any color / fragrance you want.  If you'd like to go the more natural route, you can use castile soap and essential oils as shown on this site.

Happy DIY'ing!

Sunday, June 15, 2014

Happy Father's Day!

Happy Father's Day to all the dads out there!  Hoping everyone is having a wonderful time with their families!

Some fatherly moments from our family photos:


Sunday, June 8, 2014

Home DIYs: Reupholstering & Inspired Bench

A couple weekend projects to share:

Reupholstering an Old Footstool

A leftover item from Mom, this footstool was a bit dated, but in otherwise excellent condition.  To make it more "ours", I re-covered it with something more my style.  And it was easy!  I basically wrapped the fabric around the footstool (with wrapping-paper-on-a-gift-esque corners) and stapled it in place.  It took all of 10 minutes.


Inspired Bench / Storage (still in progress)

I loved the look of Pottery Barn's bench seating and wanted something similar.  I bought an Ikea Kallax shelf, 2 Kallax door inserts, and 2 Branas baskets.  I had old foam cushions from a past patio set and cut it up to fit the bench top.  At the moment, I'm trying to figure out what to use as a cover.  Originally, I wanted to use the striped fabric shown below, but I'm a little wary of it being kid / stain friendly.  I might use the stripes for accent pillows instead and a dark / wipeable fabric (outdoor fabrics work well!) for the seat.


Hope everyone had a great weekend!

Sunday, June 1, 2014

Bedskirt and In-Process Headboard DIYs

Making our new house our home has been a process - some fun (sewing pillows / bedding) and some not so fun (installing a new RO filtration system which led to a chaotic mess of also replacing the kitchen faucet and some piping - how did I become the plumber of the household?).  The good news is that I think we're on the fun part now!  This weekend, I focused on bedroom DIYs:

DIY Bedskirt 
Time: ~30 minutes 
Cost: $20 for 3 yards of fabric on sale

Bedskirts are ridiculously expensive ($50 for plain ones and $100+ for prettier patterned ones - King), but SO easy to DIY.  Another complaint?  Store-bought bedskirts never seem long enough.  I don't know if our bed sits too high, but previous skirts always hung 2" above the floor making all our unsightly under-bed storage very visible.

This bedskirt is simply a very long rectangle wrapped around the boxspring and stapled into place.  It took 15 minutes to hem the sides and maybe 10 to staple.  The length is 18" and corners are box pleated (see this tutorial for basic box pleat how-to).

There are so many fun prints you can use!

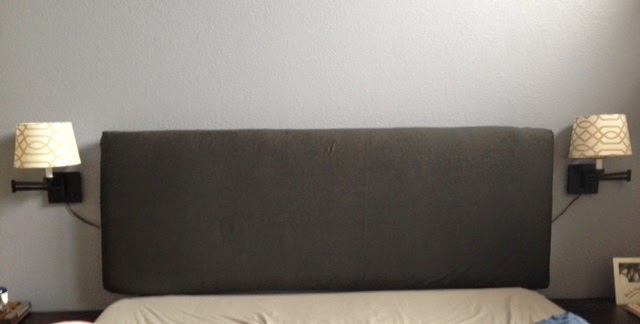
(Almost Finished) Queen to King Headboard
Time: ~2 hours 
Cost: $32 
Materials: 
Styrofoam ($6 - Home Depot)
Queen-sized memory foam mattress topper ($26 - Big Lots)
3 yards of scrap fabric to cover and put in place

Inspired by Aubrey's beautiful DIY headboard, I decided to try my hand at it too.  We had an upholstered Queen-sized headboard from our pre-King days and wanted to extend both sides.  I pondered how to properly attach plywood extensions to the existing board and wound up going uber-cheap instead with tape / styrofoam.  I don't know that I would necessarily go the styrofoam route again because of durability (my husband and I just remind ourselves not to lean too heavily on the sides), but it definitely gives you the "look" of being King-sized.

Still to do?  I want to add decorative fabric to it in the form of a fitted sheet I'll sew for the headboard so I can change it out according to whim.  I didn't buy enough of the bedskirt fabric for this, so am trying to decide if I want to buy more or go with faux leather.  I saw a gray ostrich faux leather the other day and thought it looked gorgeous.

If you have any headboard fabric suggestions, please do tell!

Hope everyone had a wonderful weekend!


LinkWithin

Related Posts Plugin for WordPress, Blogger...