
One more time, here's a photo of the DIY Inspired Dress and the Original Prabal Gurung Exploding Bow Blouse (link to J. Crew here):


See tutorial details after the jump...
What You'll Need:- An existing dress to base your pattern on (or a dress pattern)
- Contrasting colors of fabric
Step 1: Make your dress. I used an existing BCBG dress with an elasticized back (for during / post pregnancy purposes) to create a paper pattern for my new dress. You can use this tutorial to trace your own pattern from existing garments (note that this works best for simple dresses made from 2 basic pieces - front and back. Any dress featuring ~4 + pieces [front torso and skirt, back torso and skirt] will be more complicated especially if they feature darting.)


BCBG Dress Basis
Step 2: Sew and edge the following (you can adjust these sizes if you'd like your bows larger or smaller):
- 2 rectangles of 6.5x13"
- 1 rectangle of 5.5x11"
Step 3: Create your bows. Here I'm using ribbon to demo because I played around quite a bit when I made the dress bows before settling on a method. Take the rectangles you just sewed in Step 2 and pleat them down the middle. Stitch all the way through the center of your pleats several times to secure and knot. You should not be able to see your stitches from the front of the bow.

2 longer rectangles + 1 shorter rectangle

Pleat down the middle

Stitch through all the pleats (for easy demo purposes, I'm just pinning them)
Step 4: Arrange your bows. I criss-crossed the 2 longer rectangle bows and then crossed it again with the 1 shorter rectangle bow. You can do this on an angle covering more of the right shoulder like I did (also fabric is going to create much prettier drape than the stiff ribbons used in the demo photos).

Long rectangle bow #1

Criss-crossed with the 2nd long rectangle bow

Crossed one last time with the short rectangle bow
Step 5: Hand tack the bow ends onto your dress. See the stitches right above the "Gal" portion of the center "SewPetiteGal"?

And you're done! I hope this tutorial was helpful - please feel free to ask question in comments or via email. Here's the front and back of the dress:

And finally, it even accommodates a preggy!
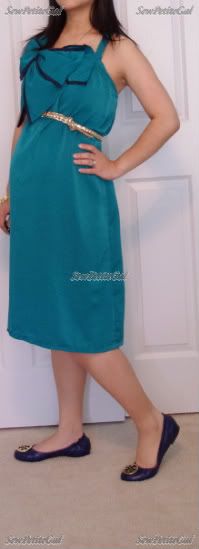
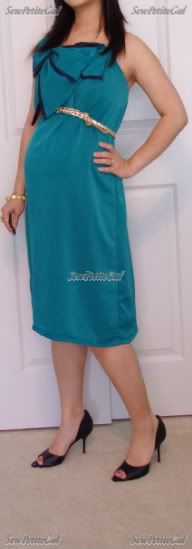
Eek, what a difference heels make! Aside from looking overall slimmer, it seems to also help my posture somehow.
Left: Tory Burch Reva Flats, Blue
Right: Gucci d'Orsay Pumps, Navy
One last random note, does anyone have any breaking-in tips for TB Revas? They fit, but aren't very comfy at the moment.
i wish i had time to try this, that dress is adorable and you did such a great tutorial! i cant wait, we get our AS jewelry soon :)
ReplyDeleteThanks for the DIY...still don't know how to do it (because I am just bad at these types of things) but it looks fab!
ReplyDeleteAnd I am sure the TB takes forever to break in...
Wow they bows look nearly identical! I love this DIY. I'm not as creative so I think if I tried this, I would fail horribly.
ReplyDeleteAaak! I saw this photo in my blogger reader and did a double take at the resemblance. You did a fantastic job, as usual. I love the color of your dress and piping.
ReplyDeleteJust found your blog, this is so cute and I love your detailed step by step. This dress looks great and I'm not crafty but I think I could make this bow. It's very chic and this color is great. I like how you showed it with heels and flats.
ReplyDeleteFollowing you now
xoDale
I have a fashion blog here in San Francisco if you have time :)
www.savvyspice.blogspot.com
Wow you did a tremendous job!!! I love the result!!!
ReplyDeleteYou look really nice!!!
xx
http://dontcallmefashionblogger.blogspot.com/
omg you did such a awesome job replicating this. it look so professionally made. i'm jealous...lol
ReplyDeleteyou look really nice in it and i love the belted look.
Great job. Thanks for the tutorial... Since I am just lazy, I might get a longer tank, shorten it, take the residual to create the bow... Not too sure if I am that motivated to do it, but if I do I'll let you see the end results. :)
ReplyDeletenice DIY, thanks for sharing it looks awesome!
ReplyDeleteAhh! The back is just as cute as the front! One of my top three favorite DIYs of yours ever. This list seems to always be changing :)
ReplyDeletePS - Forgot to mention, yes, please do recreate the BCBG dress!
ReplyDeleteThat is so cool! As always, your DIY looks the same or better than the inspiration. Bout to say, if you ever get tired of wearing your DIY dresses, please post a sale page for us, I'll totally be rummaging through there, haha! I wish I had the time and skill to try out your DIY tips!
ReplyDeleteIn theory, you make this seem simple, but in practice, I'm sure I'd just mess it up somehow! Hahaha. I love it though, so I will be saving this project as well, and hopefully, I will attempt it somewhat successfully in the future! =D Thanks for sharing! It looks great on you!
ReplyDeleteThat is just gorgeous.Great job!!!
ReplyDeleteSo very pretty! I just found your blog, following now. Love all your sewing tutorials!
ReplyDeletePurses & Puppies - Thanks so much! Did you get your AS jewelry? I got mine on Wednesday and was surprised at how big the earrings were :) But I LOVE the necklace and rings!
ReplyDeleteElle - Thank you!! I'm still planning on doing a scalloped hem dress/skirt using your tutorial :)
Jessy - Thanks so much! You should totally give it a shot! :)
Jean - That's so sweet - thank you!! :)
Dale - Thank you Dale for the kind words!! I'm following you now too :)
Francesca - Thank you so much!!
Ping - Aww, thank you! I'm definitely far from professional but I hope to keep building skills :)
Fashion and Number - Oh I would so love to see that! Fab idea by the way - I may try that :)
Pop Champagne - Thank you so much!
Cee - The elastic back is so fit friendly that I think I'll incorporate them into future dresses too :) Thank you for the kind words! I'm definitely going to try the BCBG dress - I'm hoping to still find a photo of it full-length.
Olyvia - You are too kind!! I'll definitely do a blog sale or something if I get tired of something :)
LePetiteLemon - Hehe, I think my new personal challenge is to see how many tutorials make it to your list of future projects :) Thank you - you really make my day!
Gigi - Thank you very much! :)
Abby - Thanks for dropping by, commenting, and following! :)
You are so talented! That's an awesome looking dress and yes those heels seem to transform you! I wore heels while I was pregnant. They seemed to help me with the posture n I want to think that it was because of them I never got backache. Oh yes they made me feel sexy too :-)
ReplyDelete