Tuesday, August 27, 2013

Sewing 101: Invisible Zipper Tutorial

I'm not an expert by any means and there are MANY great zipper tutorials (2 of my favorites here and here), but I wanted to share this from the perspective of someone who has never been a "natural" at anything.  I have a tendency to take shortcuts / do things my own way / learn via trial and error and this is the easiest method for me when it comes to sewing in a zipper.  :)

Typical Zipper Lengths and Project Types:
  • 7-9" = Skirts
  • 12-14" = Side zips on dresses / tops
  • 20-22" = Back zips on dresses / tops
I personally use the 7-9" and 20-22" sizes the most.  Though side zips are nice in minimizing a zipper on the exterior, I find that the zipper tab bothers me throughout the day.  I stock up on white, beige, and black zippers during every sale and find that those are really the only colors I need.  I do also pick up odd colors on clearance (sale goggles are applicable with sewing supplies too) and throw those in on occasion (like this leopard print with lilac zipper).  Since you only see the zipper tab, even an out-there color doesn't matter too much.

Getting Started:
If you read the directions on the packaging, they advise you to iron the zipper first so that the area folded underneath the teeth is exposed and ready for sewing.  In order for your zipper to be "invisible", you need to stitch right along this little groove (great pictures in the tutorials mentioned above).  For whatever reason, I can never seem to iron to the point of it being completely exposed (might be the fear of accidentally burning my fingers or melting the zipper).  So I forgo the ironing and move right along.

What I do:
1.) Unzip the zipper and align one side first.  I place the zipper stop at where the top of my garment will be.  Pin in place.

In the case of the skirt below, this is halfway up the length of the waistband.

2.) Baste one side.  
3.) Close the zipper to align your other side by matching the waistband / skirt seams up.
4.) Baste the other side.  Do not worry about basting these perfectly!  As you can tell, I do these pretty quickly because the main purposes of basting are to allow for try-ons and test zipper positioning. In the event that the garment needs to be looser or tighter, you just need to tug the bobbin thread and the whole zipper will come off for easy realignment.

Quickly baste your zipper in to test garment fit and zipper positioning

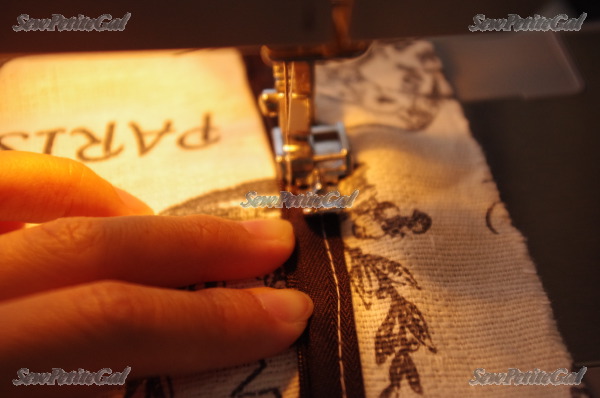
5.) Once I'm happy with the positioning, I use a regular zipper foot (I tried one of those plastic invisible zipper foots once and could not get the stitching close enough for the zipper to be invisible) to stitch along the groove.

5a.)  To do this, I use the wider part of the foot base to push the teeth down and my fingers to expose the groove while I slowly stitch my way down.  Caution - be very aware of of where your fingers are in relation to the needle!


 6.) Repeat Step 5 for the second side.  The bonus to pre-basting is that the zipper won't get away from you while you're sewing along the groove.

Once complete, you can remove the basting if you'd like.  I usually just keep it in since it doesn't affect anything and no one can see it in the interior.

True to its name, the zipper should be invisible when zipped 

 7.) To close up the rest of the garment beneath the zipper, simply position your needle alongside your zipper right above its tail and sew all the way down.  Remember to backstitch at the beginning and end.

8.)  Now time to close up the top of the zipper.

If you were to fold this over normally to stitch down, the top of the zipper tape might become exposed:

My Mom taught me to simply fold the fabric over the zipper and stitch closely along the teeth:


When you flip the fabric over, you'll see that both the excess fabric and top zipper tape are neatly enclosed:

Finished!

Exterior view of installed zipper - see the visible tab?

How the zipper looks from the interior

Questions?  Please feel free to comment below, tweet me, or email me.

Sunday, August 25, 2013

Tutorial: Box Pleated Skirt DIY

A continuation from last week's post, here's the tutorial for the box pleated skirt.

Box Pleated Skirt DIY

Difficulty: Easy

Time: ~2 hrs

Materials:
  • ~1 yard of 54-60" wide fabric - you'll want something that will hold a little structure like a cotton
  • 9" invisible zipper
  • Optional interfacing (more info in this tutorial)
Due to the number of photos, please see the rest of the tutorial after the jump.

Wednesday, August 21, 2013

Box Pleated Skirt DIY

I've been trying to devote time to round 2 of my black tie DIY, but the more I do, the more of a "sewing block" I have.  So I decided to relax my sewing brain with a simple skirt project.

Difficulty: Easy

Time: ~2 hours

Pattern:  Make your own from a couple of rectangles - tutorial here

Materials
  • 1 yard of 56.5" wide home decor Fabric from the Fabric Outlet (Mission)
  • 9" invisible zipper

Skirt and how I wore it to work

Of course I made one for E too :)

Unrelated, but I'm totally in love with this necklace (eBay) :) 

Tutorial for this skirt is coming up in the next post!

Sunday, August 18, 2013

Bay Eats: Ramen Sets & Peppercorn Crab

I'm feeling a little under the weather today so I'll let the pictures do most of the talking :)

On most weekends, our agenda is dictated by what we want to eat.  In the SF area, the possibilities are endless.  On 2 recent outings, we decided to explore ramen and crab.

First up, Maru Ichi in Mountain View for ramen (~1300 reviews, 3.5 stars on Yelp).  The thing that struck me most when Yelping around for ramen were the various ramen combo sets that Maru Ichi offered.  We all tried a different set configuration.

Combo C: Kuro Ramen (garlic tonkotsu broth with roe and pork belly) with Negitoro (tuna belly and scallions on vinegared rice)
The noodles had a nice bite, pork belly was nicely marinated, and, true to its name, the broth was quite garlic-y (in a good way).  I loved that they had a "noodle room" up front by the entry where you could watch them make their own noodles.

Negitoro - kind of like a big deconstructed sushi roll.  Very large portion, fresh fish, and nicely flavored rice - my favorite part of the meal.

Combo B: Miso Ramen w/ pot stickers and California rolls
Always need a kid-friendly option!

 Combo A: Kuro Ramen w/ Curry Rice and Salad
My husband loves Japanese curry because it has plenty of curry flavor without being too spicy

Table garnishes included kimchi and dried garlic chips

Is it possible to be a crab-aholic?  We hit PPQ Dungeness Island (~1800 reviews, 4 stars on Yelp) to try their Peppercorn crab:

Peppercorn Crab with the Garlic Noodles
Both dishes had good flavor, but I felt like they were a little on the dry side.

Cabbage Salad (very good!) and Imperial Rolls

It's a good thing we spend 5 hours every weekend biking off the food we eat...

Wednesday, August 14, 2013

Work Bag Review: Coach Candace Carryall

Funny story.  I originally spied this bag in navy and tweeted Elle since it was similar to her Michael Kors Selma (fantastic review here).  I had absolutely no notions about buying one, but couldn't get it out of my head.  By the time I decided to purchase, the navy was sold out.  A month later, the style popped back up in a variety of colors and I pulled the trigger on Black Cherry.

Coach Candace Medium Carryall - Black Cherry

Bag Stats:

  • Dimensions = 13.25 x 10.75 x 5"
  • Strap drop = 7" - can comfortably shoulder or arm carry
  • Weight = 2.4 lbs
  • Leather = smooth, thick, and structured, not as dense as it looks
  • Details = zip top closure, 1 exterior and 2 interior zip pockets, 2 interior open top pockets
  • Color = I had imagined that Black Cherry would be a deep burgundy color, but it turned out to be a muted red, like a dark tomato color
  • Price = $199, on sale at coachfactory.com

The structure of the Candace is especially apparent next to my 6-year-old, previous work bag (also Coach)

I'm rather enamored with the oversized tassels and no-nonsense logo (I'm not a fan of the script logo I've seen on other Coach bags)

Surprise!  There's an exterior pocket on the back

The main drawback to this bag is the lack of feet to prevent bottom scuffing

Separating zip top means there are no hassles in taking things out / putting things in

Spacious interior w/ 2 zip pockets & 2 open top pockets

Holds all my daily items plus my laptop and water bottle when needed

Overall, I love the clean / sleek look, spaciousness, and structure.  I thought the price point was very fair and I'm quite happy with my purchase.  This satchel style is perfect for work.  Thanks Elle for the inspiration :)

If you're looking more for an everyday bag, here are some previous reviews for crossbody bags.

Sunday, August 11, 2013

Black Tie DIY: Phase 1

I wanted a more dramatic look for this year's black tie DIY (see last year's dress) and decided I would go with a fuller skirt, a print, and a bodice that would allow me to wear a regular undergarment (I feel like I'm constantly readjusting strapless bras) / feature a necklace of some sort.  After making a couple test bodices, I went with a simple one that seemed to fit my needs.  I was happily finishing up when my husband happened upon me and asked why my dress was skewing so "bridal."  I was about to protest  until I took a long look at my dress and realized he was right.  Epic FAIL.

The (inadvertently bridal) dress DIY

I added a tie at the back to dress up the simple bodice

So what do I do with this dress now?  I contemplated doing some kind of overlay, but ultimately, I think I'm just going to sew a different dress.  The rose dress will probably be a (very elaborate) Halloween dress - maybe the Queen of Hearts from Alice in Wonderland?  I seem to remember her having all the roses painted red in the cartoon.  I could then make E an Alice costume, V a Mad Hatter, and some yet to be named male character for my husband.  Ha, now I've roped in the whole family!

Phase 2 will consist of a new dress using this bold black / white paisley found at Fabrics R Us:


I might change the bodice in favor of something less plain.  Wish me luck!

What kinds of bodices / silhouettes are you drawn to for black tie occasions?

Thursday, August 8, 2013

Pulled Pleat Skirt DIY

With every season of Project Runway, I feel inspired to drape on my dress form.  They make it look so easy!  I lack their techniques, so made a very simple modification to make my skirt a little different.  Using this tutorial, I cut the skirt longer and pulled the pleat up through the waistband instead of gathering the front.  Pin pleat in place, snip excess at the waistband, and then even out your hem.  You can pull as little or much as you like - just stop whenever it gives you your desired look.

Fabric: 100% cotton, Joann's, 45" width

Difficulty: Easy

Time: ~1.5 hrs

Pulled Pleat Skirt DIY
Ruffled Top DIY (original post here)

Sunday, August 4, 2013

Easy Reversible Colorblock Skirt DIY Tutorial

Removable elements, reversible pieces, whatever - I love a gimmicky garment that offers options.  I had a small stripe of tan knit fabric from a previous colorblocking project and decided to use it in a skirt.  To make it kind of fun / versatile, I decided to make it reversible from tan / black to white / black.

Reversible Skirt DIY

Difficulty: Easy

Time: ~2 hrs

Materials:
  • Your choice of colorblocking fabrics (also feel free to mix more than 2 blocks)
  • Elastic for waistband
Due to the number of photos, please see the rest of the tutorial after the jump.

LinkWithin

Related Posts Plugin for WordPress, Blogger...