Showing posts with label Sewing 101. Show all posts

Sunday, September 21, 2014

Sewing 101: Tools for Your Sewing Kit

Continuing with beginner sewing, I thought I'd share some useful tools to incorporate into your sewing kit.

They fall into 4 categories:

1.) Cutting - Local fabric stores frequently promote this category for 40-50% off, so wait for a sale!

  • Scissors - sharp blades are a must to cut cleanly through your fabric (especially temperamental ones like chiffons).  I've been using Fiskars Razor-Edge Shears.  
  • Rotary Blade - as with scissors, a good quality blade is required to cut your fabric well.  I tried a cheapie once and it would fray the fabric before cutting through.
  • Rotary Mat - necessary for your rotary blade and helpful for measuring as well
  • Straight Edge - any hard ruler will work to be used in conjunction with your rotary blade and mat

2.) Measuring

  • Soft measuring tape (not pictured) - great for taking your body measurements (measuring tips here) and for fabric
  • Regular (hard) ruler - handy for pattern drafting (I use it to draw in waist lines etc.)

3.) Fixing

  • Small screwdriver & brush - (should come with your sewing machine) The screwdriver will be needed for changing out your sewing needles and the brush will clean the lint from the inside of the machine.
  • Seam ripper - this is probably the hardest working tool you'll have.  I've probably spent more time ripping things apart than sewing them together!
  • Tweezers - useful for digging lint out of your machine or knotted threads when the machine jams

4.) Sewing (most feet also come with your sewing machine)

  • Zipper Foot - for zipper insertion, but I also use it for blind hems (tutorial here) (silver foot at the bottom of the photo)
  • Standard Foot (not pictured) - for all-purpose / general sewing 
  • Buttonhole Foot - this nifty one holds your button on one end and provides the machine the exact length needed for your buttonhole (long white foot at the bottom of the photo)
  • Thread (not pictured) - get the basics (black, white, cream, and navy) and then fill in as needed.  Beware of reds and greens!  I always wind up getting the wrong shade so try bringing a swatch when possible. 
  • Bobbins (not pictured) - I'd recommend getting 10+ (I have about 20) so you're not always trying to switch out thread colors

Sewing Kit Items

Other "getting started" posts:

1.)  Materials & Tools
2.)  Sewing Tasks
Hope this was helpful!

Thursday, September 4, 2014

Sewing 101: Your Sewing Machine

A few of you expressed interest (thank you for the feedback!) in more beginner sewing posts.  To get started, let's go over some basics of a sewing machine.  Please note that these are all my personal opinions based off of my experiences as a sewing hobbyist.  I am by no means an expert of any sort.


General cost:
$100ish, mine cost $130 shipped from Amazon (Singer Heavy Duty 4423 Sewing Machine [affiliate link])

What to look for:
I tend to look for good reviews and then look for features that suit me well.  In my case, I wanted a basic machine that would be durable and able to handle thicker fabrics.  The Singer Heavy Duty mentioned above met those needs for a great price point.  I was particularly drawn to the fact that it had a metal frame.  My previous machine was a cheapie plastic one from Walmart and it was horrible.  For about $30 more, I felt like I got more than my money's worth with the quality of the machine.  Another benefit?  Drop in bobbin and simple button-hole process.

Sewing Machine Basics:
Nowadays, most sewing machines come labeled with numbers and illustrations on how to thread.  This is probably one of the first steps you'll take.

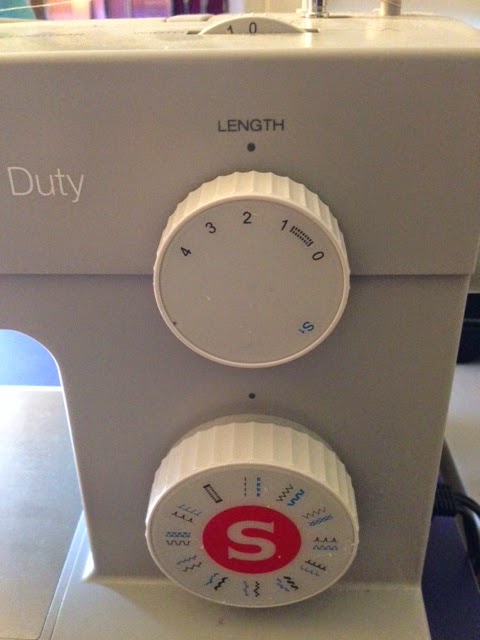
After threading, you'll want to set your stitch length (top knob) and stitch type (bottom knob).  For most clothing sewing, you'll use a stitch length of 2.5.  The smaller the number, the shorter your stitch.  Small stitches have the benefit of lending strength to your sewing, but it takes longer to sew, it uses up more thread, and they are a pain to rip out.  Longer stitches (like a setting of 4) are great for trial sewing like try-ons or for use in gathering, but the stitching is too loose / weak to keep things together long-term.

For the stitch type, the straight stitch will be your go-to.  Other stitches commonly used are zig zag for knits, the shark-tooth one (yeah, I use super technical terms) for blind hems, and the button-hole one (looks like a rectangle to the left of the straight stitch) for...well...button holes.  :)

Do you see the Reverse button at the bottom left?  Press down on this to stitch in reverse.  I use this to reinforce stitching at the beginning or end of a seam.

Right above that is a tension knob.  I can't say I've had to use this often, but here's a wiki in case you need it.

To the right of the tension knob is the needle position knob.  I primarily use this for zippers or adjusting my seam allowance.  For narrow hems, I'll use the rightmost setting.  I generally keep the needle position in the middle for the majority of my sewing.

Once you know your way around the basics of a machine, start sewing simple projects like pillows or scarves.

I hope this post was helpful!  Please let me know if you have any questions!

Wednesday, February 26, 2014

Sewing Tips for Your Body Type

As with purchasing clothing, understanding your body type when sewing is an important factor.  After all, if you're going through the trouble of sewing it yourself, it should be custom fit to you.  Through trial and error, 30+ years of dressing myself, and getting fit education tips gleaned from the petite blogger community (thanks gals - see blogroll), I feel like I'm much better equipped now than when I first started.

Areas to consider:
  • Measuring yourself
    • All you need is a soft measuring tape!
  • Frame
    • One frame "classification" may not work for your whole body.  For example, I'm narrow at the shoulders, chest, and maybe ribs, but I'm average at the waist, hips, and legs.  I like to adjust my patterns using this method.
  • Proportion and size
    • Torso length, leg length, and where the waist and hips fall are all areas for adjustment.  I have a long torso and short legs, but my waist sits high.  In my case, I typically raise the waist 1/2" and lengthen tops.
    • I don't currently sew pants (tried once and failed miserably), but the knee placement is important.  I can't tell you how many pants I've purchased where the bottom of the thigh portion sits at my knee and makes the fit look off / sloppy.
  • Figure flattery (my opinion only)
    • Hem length
      • From a personal standpoint, my stance is that fuller skirts = shorter length and vice versa.  I like my fluffy pleated skirts to hit ~2" above the knee and pencil skirts to graze my knee cap.  In contrast, when hemming pants, fuller legs = longer length.  I used to hem bootcut pants too short and looked ridiculous when trying to wear heels with them.
      • For maxi dresses, I like the length to hit just above the floor.  I can't say that's always practical though!
      • Jean had an excellent post on skirt lengths here
    • Masking problem areas (like mine)
      • Got a tummy?  Fit and flare dresses, pleated / gathered skirts, and peplums are great ways to hide it :)
      • Self-conscious about your arms?  3/4 length sleeves are my favorite!
      • Self-conscious about your legs?  I either hide them with maxis or make the most of them using the skirt length tips above :)  
I hope this (wordy) post was helpful!

Sunday, November 10, 2013

Sewing 101: Self-drafted vs. Commercial Patterns

I personally approach patterns 2 ways: 1.) draft my own based on existing garments 2.) use commercial patterns.  Here are my personal views of when to use each if you are newer to sewing.

Drafting based on existing garments
  • Use for simple silhouettes like sleeveless blouse-y tops, shift dresses, OR freehand draft skirts based on rectangles (1, 2, 3)
  • Pros:
    • Nicely mimics the fit of something you are familiar with
    • Free
  • Cons:
    • Not always suitable for more complicated garments
Commercial Patterns
  • Use for complex garments like long-sleeved tops, darted bodices, intricate seaming, non-pajama type pants
  • Pros
    • Are essentially packaged tutorials with clear directions on construction, helpful tips, and patterns in multiple variations.  For example, one pattern will contain sizes 6 through 14.  This is fantastic for people (ahem, me) who have different sized tops than bottoms. 
    • The larger pattern companies like McCall's, Simplicity, and Butterick are often on sale at your local fabric store for ~$1
    • Want to go designer?  Vogue offers big name designs from famous names like Michael Kors, Donna Karan, Rebecca Taylor, and Badgley Mischka.  These are typically more expensive (~$5 on sale), but still a great way to tackle more complicated / innovative designs at home.
  • Cons
    • Despite providing measurements for fit, variations in individual bodies mean these still require adjustments and alterations.  For example, I have a narrower frame than average and need to adjust my patterns this way.
    • Basic garment types are easy to find, but you can't always find an exact match for what you're picturing.  In this case, I piece together several patterns or draft part of my own.
Basic Commercial Pattern (McCall's M5972) for a Bodice
Blue arrows indicate dart placements
Red boxes for details like measurements and where to lengthen or shorten

Examples of patterns from Voguepatterns.mccall.com

Hope everyone had a great weekend!

Tuesday, August 27, 2013

Sewing 101: Invisible Zipper Tutorial

I'm not an expert by any means and there are MANY great zipper tutorials (2 of my favorites here and here), but I wanted to share this from the perspective of someone who has never been a "natural" at anything.  I have a tendency to take shortcuts / do things my own way / learn via trial and error and this is the easiest method for me when it comes to sewing in a zipper.  :)

Typical Zipper Lengths and Project Types:
  • 7-9" = Skirts
  • 12-14" = Side zips on dresses / tops
  • 20-22" = Back zips on dresses / tops
I personally use the 7-9" and 20-22" sizes the most.  Though side zips are nice in minimizing a zipper on the exterior, I find that the zipper tab bothers me throughout the day.  I stock up on white, beige, and black zippers during every sale and find that those are really the only colors I need.  I do also pick up odd colors on clearance (sale goggles are applicable with sewing supplies too) and throw those in on occasion (like this leopard print with lilac zipper).  Since you only see the zipper tab, even an out-there color doesn't matter too much.

Getting Started:
If you read the directions on the packaging, they advise you to iron the zipper first so that the area folded underneath the teeth is exposed and ready for sewing.  In order for your zipper to be "invisible", you need to stitch right along this little groove (great pictures in the tutorials mentioned above).  For whatever reason, I can never seem to iron to the point of it being completely exposed (might be the fear of accidentally burning my fingers or melting the zipper).  So I forgo the ironing and move right along.

What I do:
1.) Unzip the zipper and align one side first.  I place the zipper stop at where the top of my garment will be.  Pin in place.

In the case of the skirt below, this is halfway up the length of the waistband.

2.) Baste one side.  
3.) Close the zipper to align your other side by matching the waistband / skirt seams up.
4.) Baste the other side.  Do not worry about basting these perfectly!  As you can tell, I do these pretty quickly because the main purposes of basting are to allow for try-ons and test zipper positioning. In the event that the garment needs to be looser or tighter, you just need to tug the bobbin thread and the whole zipper will come off for easy realignment.

Quickly baste your zipper in to test garment fit and zipper positioning

5.) Once I'm happy with the positioning, I use a regular zipper foot (I tried one of those plastic invisible zipper foots once and could not get the stitching close enough for the zipper to be invisible) to stitch along the groove.

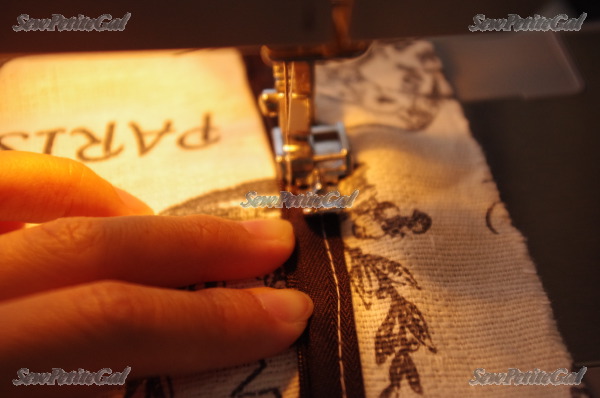
5a.)  To do this, I use the wider part of the foot base to push the teeth down and my fingers to expose the groove while I slowly stitch my way down.  Caution - be very aware of of where your fingers are in relation to the needle!


 6.) Repeat Step 5 for the second side.  The bonus to pre-basting is that the zipper won't get away from you while you're sewing along the groove.

Once complete, you can remove the basting if you'd like.  I usually just keep it in since it doesn't affect anything and no one can see it in the interior.

True to its name, the zipper should be invisible when zipped 

 7.) To close up the rest of the garment beneath the zipper, simply position your needle alongside your zipper right above its tail and sew all the way down.  Remember to backstitch at the beginning and end.

8.)  Now time to close up the top of the zipper.

If you were to fold this over normally to stitch down, the top of the zipper tape might become exposed:

My Mom taught me to simply fold the fabric over the zipper and stitch closely along the teeth:


When you flip the fabric over, you'll see that both the excess fabric and top zipper tape are neatly enclosed:

Finished!

Exterior view of installed zipper - see the visible tab?

How the zipper looks from the interior

Questions?  Please feel free to comment below, tweet me, or email me.

Sunday, June 9, 2013

Sewing 101: Blind Hem Tutorial (Using a Zipper Foot)

For what seems like an eternity, every time I did a blind hem on the sewing machine (had hand sewed my hems for about the first year), it seemed like such a long and arduous process.  I considered purchasing a blind hem foot to help me get a better, more uniform look, but a lightbulb turned on yesterday as I was inserting a zipper.

My problem with using the All-Purpose Foot was lack of visibility.  I wasn't sure how best to align my fabric to ensure a consistent, even stitch.  The Zipper Foot's open sides addressed the visibility issue while the notched area addressed fabric alignment.


Difficulty: Easy 

Time: About ~15 minutes for a skirt hem

Materials: Zipper Foot, thread that closely matches your garment

Steps:
1.  Try on your garment and pin your desired hem length.

2.  Set your machine to the stitch in the photo below:

3.  Switch out your All Purpose Foot for the Zipper Foot and fold your fabric as directed below.


This post was inspired by Ping and our sewing conversations :)

For the traditional method using a blind hem foot, check out a great tutorial here.

Sunday, April 7, 2013

Sewing 101: How to Line a Top

Lining a garment provides several benefits: 1.) great to add opacity to sheer fabrics 2.) finishes all of your raw edges 3.) if your outer fabric is itchy, lining can provide a smooth barrier.  I'm currently in midst of creating an embellished nude shell (thinking of adding cascading petals at the moment) and figured I'd show you the process of lining my top while I was at it.  2 birds, 1 stone :)

What You'll Need:

  • Shirt fabric and lining fabric (In my example, I'm lining my shirt with the same fabric.)
  • Shirt pattern: tutorial on how to create your own OR buy a commercial one

Steps:

1.) Cut out 2 complete tops using your pattern

2.) Take 1 top and align the front with the back.  Make sure the right sides of the fabric are together and sew along each side of the top from the underarm to the bottom.  Do the same with the lining.

3.) Place the lining inside your top with right sides together. (Ahem, I took a picture of it with wrong sides together, sorry!)

 4.)  Sew along the armholes and neckline.  Do not sew the shoulders yet.

5.) Flip your garment so that the right sides are facing outwards.  Tuck one shoulder inside the other shoulder.  (This helps me orient myself)  Flip the exterior layer over.  (This makes more sense if you look at the picture below)

6.)  The shoulders should now be sandwiched together like the photo above with the right sides of the shoulders together.  Stitch the shoulder closed.  Do the same for the opposite shoulder.

Both sides of the shoulder should now look like this.

7.)  Just hem as desired and you're finished!  The best part is that you can use this tutorial to line your tops OR to create a reversible top since each side is completely finished and no raw edges can be seen on either side.

Hope this was helpful!  

Wednesday, March 27, 2013

Sewing 101: Finishing Edges w/ Bias Tape

I use 3 main ways to finish my edges: 1.) use bias tape, 2.) use facing, 3.) just fold over and sew (doesn't work well on arm / neck openings).  Today, I wanted to share how I do #1 using bias tape (can be purchased at any fabric / craft store for approximately $2 or less).

Difficulty: Easy
Time: Fast, ~15 minutes to finish neck and arm openings
Material: 1/4" or 1/2" single fold bias tape in a color close to your garment

Unfold the right edge of your bias tape and align the tape's edge with your fabric's edge.  

Sew right along the groove of the bias tape fold.

Flip over your fabric so that you see the right side like the left picture.  Fold your bias strip under your fabric.

Sew a row of stitching to secure your bias tape under your fabric and encase your raw edges.

Voila!  Raw edges no more!

Pros:

  • Inexpensive to purchase and easy to use
  • Does not use up any additional fabric

Cons:

  • Leaves a visible line of stitching on the outside of your garment

I'll cover facings in a future post.  If you have any questions, please feel free to ask in the comments :)

Sunday, March 10, 2013

Sewing 101: Fabric Selection

This is my personal way of thinking of fabrics and fabric selection.  It is by no means an end all be all, just a compilation of what I've learned and currently adhere to :)

Fabric Shopping:
I am a fabric molester.  When I visit a fabric store, I touch every single bolt that looks interesting and from there, I decide on whether it's suitable for me.  When feeling, I'm looking for:
  • Stretch
  • Thickness
  • Structure
  • Opacity 
  • Skin feel - will stay away from itchy or rough
  • Weave (if applicable)
  • Overall quality
The feel of these help determine what the fabric is appropriate for.

For example:
  • Stretchy + thick + semi-structured = comfortable dresses with a sculptural element
  • Thin + see-through + lightweight = dress / top with some kind of flow to highlight the fabric
  • Non-stretch + thick + coarse/rigid = pleated skirts since it holds structure and shape so beautifully
Knit dress with structured sleeves
Bow neck chiffon top
Pleated full skirt with stiff cotton

Non-conventional Fabrics:  Don't shy away from drapery / bedding / etc - I've found the prettiest prints there!  For drapery, make sure it is machine washable.  Some fabrics only allow spot treatment.

Drapery fabric made into map peplum skirt and sailboat dress
Bedding made into shift dress

Best Fabric for Beginners: Cotton - easy to cut, straight-forward, sews well, relatively inexpensive.  You can purchase 44-45" wide cotton at any fabric store for roughly $3 a yard

"Difficult" Fabrics:
  • Chiffons - can be difficult to cut.  I generally sew this while holding it semi-taut.  It's worked for me, though I'm not sure that's the correct way to do it.
  • Silkies - can sometimes slip during sewing.  I use the same semi-taut sewing style as with chiffons and make sure to guide it while sewing.
  • Satins & Shinies - can pucker easily and show mistakes.  
  • Jerseys - can be difficult on regular machines because you need to adjust your stitching to account for the stretch.  Otherwise, your stitches will pop.  To rectify, use a twin needle or zigzag stitch.  Very easy on serger where the stitches have built in stretch.
Structure vs. Drape:
I once tried to make a drape-y shell out of satin.  This was a horrible idea.  The satin had so much structure that the shell wound up looking like a tent.  Belting / tucking made it worse because the gathered areas wound up looking like it had very poofy wrinkles.  Lesson learned - don't try to "drape" a structured fabric.  Structuring a drape-y fabric (think knits) is doable, but don't expect it to hold any rigid shapes.

How much to buy?
The most accurate way to determine how much you need is to go by your sewing pattern.  The back of the envelope will always tell you the amount of fabric / notions are needed to create the garment.  If you're buying without a specific style / pattern in mind, here are some basic amounts and what you can create with it:
  • 1 yard = suitable for sleeveless tops and some skirts (think A-line)
  • 1.5 yards = short or 3/4 sleeved tops, pencil skirts (I always purchase extra yardage for pencil skirts in case of mess-ups)
  • 2 yards = knee length fit & flare dresses / sheaths / shifts (buy a little extra if going for a long-sleeved garment, sleeves take up much more fabric than you'd think - as do pockets!), cropped jackets, full pleated skirts
  • 2.5 - 3 yards = floor length maxi dresses, knee-length coats, boyfriend blazers
  • 4+ yards = Ball gowns, entire outfits (dress + jacket)
Collecting Fabrics:
I am also a fabric hoarder.  I used to buy anything and everything that looked interesting to me.  For the most part, fabric is considerably less expensive than clothing so it's also easy to get carried away with buying.  As a result, I have a giant bookcase and several storage bins jam-packed with fabrics.  While useful if there should ever be a fabric apocalypse, it's not very practical, hogs way too much space, and I wind up with a bunch of what-if fabrics that could possibly be suitable for something at some point, but not right now.  

My current approach when buying is to always think of at least one or two projects I could see myself actually doing with the fabric.

I hope this was helpful!  Questions?  Please feel free to leave them in the comments :)

LinkWithin

Related Posts Plugin for WordPress, Blogger...