Tuesday, November 30, 2010

More DIY Pearl Necklaces :)

My mother-in-law really liked the Twisted Pearl Necklace (tutorial posted here too) I made in this posting, so I decided to make her a variation of it for her Christmas gift (shhh!).  You can essentially use the same tutorial but instead of twisting it, just tie a knot in the middle and voila!  Super easy!


 And a close-up:

I've been on quite the pearl kick for the last few months but I just can't get enough!  I love the femininity of them and how they go with almost every single thing.  This one is a triple strand in dove gray.  It has larger pearls in the middle and smaller ones on the sides to add focus to the center.


For the closure, I wanted to echo the theme of threes and did 3 chains connected with a clasp.

And part 3 of my pearl craziness is a mix of pearls with chains.  I think I just really like the interplay of something delicate with the toughness of chains.  This one I made super long to be more dramatic but it is adjustable in the back to make it shorter.


And the requisite close-up :)

It's pretty obvious from this posting that I've got pearls on the brain lately LOL!  What's on your mind lately?  Anything on your wish lists?

Monday, November 29, 2010

To Sew a Boucle Skirt + OOTD

Just a quickie sewing project + OOTD posting :)

Top: Banana Republic Black Button Down, XS (old)
Skirt: DIY
Belt: The Limited Flower Chain Belt (out of stock online, but you may still find it in the store)
Black Peeptoes: Blowfish Festival Wedges, DSW

Amongst the garment sewing world, skirts are generally one of the easier types to sew yourself.  Pencil skirts, for whatever reason, are difficult for me to get right the first time around.  Usually it's the tush's fault - the skirt is either too narrow or too wide there so I keep going back in with a seam ripper.  Or the bottom is too wide so that it's less of a pencil and more of a triangle.  I think it ultimately comes down to practice and knowing my own measurements.  Hmm, looks like I rambled a bit here...sorry!

I am pretty happy with the way this particular skirt came out and I do really like the texture / pattern.  I also made a lace print version and a plaid wool version that I'll post OOTDs with later.

Monday, November 22, 2010

7 Confessions and Equestrian-Inspired OOTD

Petite XXS tagged me in her Seven Confessions posting and of course I have to oblige :)

1.  I HEART karaoke...in the privacy of my own home LOL.  I have all of the Karaoke Revolution games from PS2 to Wii (with the exception of country music ones) and really enjoy belting it out on random nights.

2.  I only started sewing/crafting when I went on maternity leave last year.  I took a year off (without pay of course) and needed to be more mindful of finances.  As you know, I am a shopper at heart but since I couldn't really do that, I took to making my own versions.

3.  I was born in Hong Kong but moved to Indiana as an infant.  I speak Cantonese and a little Mandarin.  I took 2 years of Chinese in college but have since forgotten almost all of it.

4.  I am OBSESSED with food.  Hubby and I travel specifically to eat at certain restaurants.  We had a ball on our honeymoon cruise and gained 10 lbs in 1 week.

5.  Our son is 18 months old and he is the center of our world.  My mom graciously moved in to help take care of him and has been a godsend.  This pic is from last year but I thought I'd post it since we're getting close to the holidays.


6.  I'm a deal hunter by nature but splurge on handbags and other accessories.  tPF has proved to be a dangerous place for me as I was introduced to great brands like Balenciaga and Rebecca Minkoff there as well as learning more about brands I was already aware of.

7.  I still love kiddie movies like The Incredibles, Cloudy with a Chance of Meatballs, and Up.  I may say that I'm watching them because of my son but it's not true :P

I hope I'm not repeat tagging anyone but I'd love to see confessions from:
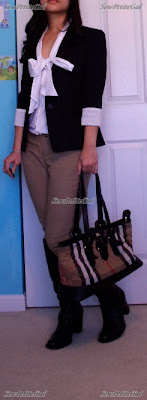
And finally an equestrian inspired OOTD:

Blazer: Banana Republic, Sz 2
Top: LOFT Bow Front Button Down, XS
(These are the pants I purchased via the Gap Give and Get sale.  They run big AND stretch throughout the day so I recommend sizing down.  Otherwise I love having skinny khakis.)
Boots: Born
Bag: Burberry

Tuesday, November 16, 2010

2 DIY Skirt Projects - Lace and Nautical

My most recent sewing projects revolved around skirts.  First up is a cream colored lace - a fabric I fell in love with at Joann's.  I put together an outfit that looked good in the mirror (I swear LOL) but looks a little off in the photo.  I think next time I'll need to tuck my top into the skirt to play with proportions.  Which do you trust?  Mirror or photo?

Top: BR Slip Dress (old), Sz 0
Cardigan: LOFT, XSP (old)
Necklace: F21 Two Tier Pearlescent Necklace, $10.80, I LOVE this!
Skirt: Lace DIY
Black Peeptoes: Blowfish Festival Wedges, DSW (comfy to stand in but not great for walking a lot bc of heel slippage)

Next up is the nautically inspired Kasia skirt:
Top: H&M Sheer Bow Blouse (old), Sz 2
Please ignore the tights and shoes - I know they don't go with the outfit, but I just wanted to show you skirt :)

And a close-up view:


I heart nautical-styled garments!  When I saw this pattern, I instantly fell in love.  The ruched side hip panels and the buttons just drew me in.  I used a heavy navy-colored suiting material for the skirt from Joann's.  I can't say that this was the easiest thing to sew as I had to redo it several times and even then had to completely forgo the pockets, BUT I do like the end result.

I think maybe next time I'll pair it with gray tights and a top with some gray as well.  How would you wear this skirt?

Monday, November 15, 2010

Drumroll Please, the Winner is...

Thank you everyone for participating in my very first giveaway!  If you didn't win, there will be giveaways in the future and I am also working on items for my Etsy shop (on the way!).  :)


And the winner is...
Ping!  Congrats!  I just sent you an email and will ship the necklace to you when I get your info :)  I hope you like it - I know you'll wear it well!


Thursday, November 11, 2010

DIY Beaded Epaulet Pin Tutorial

 A few weeks ago, Amber from Ruffles and Roses asked me if I would be interested in doing a guest post on her blog.  I was so very honored and wrote up one for the beaded epaulet pin I posted about here.  Visit her blog here for the full tutorial write-up!

Left: the inspiration from Neiman Marcus.      Right: my version :)

Tuesday, November 9, 2010

Leather Wrap Bracelet Video Tutorial

UPDATE:  To see the new multi-row beaded leather bracelet video tutorial, click here.


This is my VERY first video tutorial so please bear with me.  I know the original link to the Chan Luu inspired leather wrap bracelet tutorial has been removed and many of you have contacted me for information on how to make your own.  Click here to see my bracelet #1 and here for bracelet #2.

I have to say that this is just my interpretation of how the original tutorial was and I have modified a few things so feel free to play around with what feels comfortable for you!

What I used:

  • 2 yards of 2 mm leather cord
  • 4 mm faceted beads
  • Size D Nymo thread
  • Beading needle (personally I use a floss threader because I like that it's flexible without getting warped in the beading process - also any size thread will fit easily in the loop)
  • Beading glue (I use super glue because the bead glue I have turns white and crusty when dry)
  • Button with 2+ holes (needs to fit 2 mm cord, look for spare buttons around the house)
Steps (see written steps and video):
  1. Measure your wrist and determine how many times you want the bracelet to wrap around your wrist.  Add 2-3 inches to this for how long your leather cord should be.  I used 2 yards and wrapped it around my wrist 4 times.
  2. Fold your leather cord in half.  At the loop end, tie a knot about 3-4 inches away from the end.
  3. Optional: I like working from a stable surface so I flatten a cardboard box and use binder clips to secure each end of the bracelet while I bead.
  4. Thread your needle.  Don't worry about getting the right length - just choose what's comfortable because you can easily add more thread and secure it with a knot + glue.
  5. Knot your thread to your cord.  Form figure-8s with your thread onto the cord.  This will help secure it to your bracelet.  I typically do about 3-4.
  6. Now thread your first bead and do another figure-8.  
  7. Repeat step 5 for each bead - this is the time-consuming part.
  8. Every 10 beads or so, place a dab of glue on the bottom cord where the cord meets the bead and thread.  You might want to test out your glue earlier in the day to make sure it dries clear.
  9. Once you get about 3-4 inches away from the end, thread your button with your cord and knot the cord under the button.
  10. Voila - you're finished!

Questions?  Please feel free to comment or email me and I'll get back to you!

Tuesday, November 2, 2010

The Story of a DIY Bridesmaid Dress

Last year, one of my best friends asked me to be her bridesmaid and told me she was going with the color of teal.  After searching what seemed like a zillion bridal websites for a dress, I gave up.  It seemed that teal was not popular enough of a color to make in many different styles of dresses.  That said, most of the dresses available were very plain silhouettes (plain strapless or plain strapped) for $200 and up.  I pondered this for a bit and decided to try and tackle making one myself (keep in mind this was waaaayy before sewing any of the other things in this blog).  I figured that if it turned out to be an utter fail, I could always buy one a few months before the wedding.

Let me tell you, there was a lot of seam ripping involved with this one.  My small top made it difficult to really follow the pattern properly without making a lot of allowances and the waist is a bit too wide but all in all, I felt like it passed for a decent bridesmaid dress using only ~$20 in materials (and blood, sweat, tears).  Basically, I took a basic strapless dress pattern (McCall's 5806) and then set off trying to figure out how to make it more interesting.  I settled on a modified ruffle that I snake-pathed across the bust and up one shoulder.

 Sorry for the teeny, tiny pictures!  They were the best I could do from the online proofs.  What do you think?  Pass or fail?

Monday, November 1, 2010

GIVEAWAY: Mixed Media Pearl Necklace

It's time for my first ever giveaway!!  :D  This is a variation of the necklace I posted about below with gold glass pearls, matching gold satin ribbon, bronze chains, and various charms.  The ribbon is long enough to vary the length from choker to mid-torso.

All you need to do is publicly Follow my blog (go to my sidebar on the right and click "Follow") and fill out the form below.  I'll randomly choose a winner on November 15th.


A close-up view:


Want to make your own instead?  Check out my tutorial here.