I know you're thinking, "duh, I know how to braid, why are you doing this tutorial?" This actually uses a similar method to creating a Turk's head knot which results in a cleaner looking braid that does not require 3 strands. In fact, you can use a single strand if you wish.
What I used:
~24 inches of blue and green ropes (purchased in trim section of fabric store)
Glue
Jewelry pliers
2 jump rings
2 cord ends
1 lobster clasp
Scissors
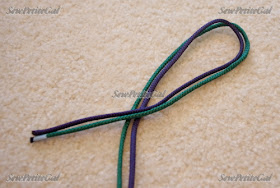
Leaving a few inches at one end, make a loop
Bring the long end up through the loop
Create a figure 8 with the loop.
For a longer braid, make a larger loop and more figure 8s.
Thread long end through the 1st portion of the figure 8
Thread long end through the 2nd portion of the figure 8
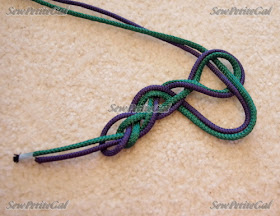
What it should look like after all threading
Lightly pull at both ends to tighten the braid. Arrange strands by tightening / loosening to get desired look.
Snip rope ends to desired length. Add clear glue to ends so rope doesn't unravel.
Dab glue in cord end and insert rope ends. Let dry. Do this for each side.
Use pliers to fold the cord ends together enclosing the ropes. Add jump ring.
Do the same thing with the other end but also add your lobster clasp.
That's it!
For different variations, add more colors / ropes or change the closures as you'd like.
DIY Nautical Rope Bracelet (buy here from Etsy)
Timex + J. Crew Strap
DIY Nautical Wrap Bracelet


This is great and so easy to follow w/your instructions/pics:) Giveaway perhaps? lol
ReplyDeleteOh good! I'm always so pleased when something looks doable from one of my tutorials!
DeleteThanks so much. It is really interesting! So if i want more braid, do i need to make more 8 in Step 'Create a figure 8 with the loop'? (sorry I don't know how to describe!)
ReplyDeleteThanks for the question! I edited my post to include that a longer loop with more figure 8s will give you a longer braid :)
DeleteThat's supereasy!! TKS!
ReplyDeleteThanks Lisa! You are so sweet for pinning this :)
DeleteAlways such great tutorials S :)
ReplyDeleteThanks so much, Elaine! :)
DeleteThanks so much for this tutorial. My daughter will love this. Going to show her when I got home later.
ReplyDeleteOoh, let me know how it goes!
Deletethis is really cool! you are so talented and so creative! :D
ReplyDelete<3, Mimi
http://whatmimiwrites.blogspot.com/
Fashion To Figure Giveaway: Win any item $30 or less
Poshlocket Giveaway: Win a Shelly Fabric Choker
Thanks for the kind words, Mimi! :)
DeleteHow neat! I thought you had actually braided them but then the ends didnt look right for that ;-) Thanks for this tutorial!
ReplyDeleteHehe, I've tried traditional braiding but it didn't give me the look I wanted :)
Deletewhat a great idea! and it looks beautifu!
ReplyDeletexxx Anita
Thanks Anita! :)
DeleteThat looks awesome - what a cute DIY :)
ReplyDeleteAnnie
The Other Side of Gray
Thanks Annie! :)
DeleteThis looks so easy, I think I might be able to attempt it =)
ReplyDeleteNo worries on the AI giveaway my dear, it will come eventually just keep me posted. Once you hear from them will you let me know, I might have to request a bigger size since I have been snacking late at night due to cramming for Finals and the upcoming bar!
Thanks Thu - I'll definitely let you know what I hear. Hope to get this resolved!
DeleteDefinitely trying this.
ReplyDeletexx,
www.yolathorp.com
Thank you! Would love to hear how it turns out :)
DeleteGreat tutorial, S! I probably will try to make these this weekend for the little one since the chain is heavy for her wrist.
ReplyDeleteThanks Sydney! Hope it turns out well!
DeleteGreat tutorial :) and loving your watch as well :)
ReplyDeletekatattack2000.wordpress.com
Thanks Katherine! I'm loving my watch too - the face is so big that I can tell time so much more easily :D
DeleteEep! This reminds me that I haven't entered your bracelet giveaway yet *runs to do that*
ReplyDeleteWill we see these new bracelets up on your Etsy shop soon? :)
LOL! I've been rather lazy at putting things on Etsy lately. I meant to put scarves up but by the time I thought of it, scarf season was long over!
Deletewow! what beautiful idea! this tutoria is amazing! i make also my congratulations for your blog! it is so well done! i love it! i invite you to visit mine....and why don't keep in touch!?
ReplyDeletea big kiss
Miriam stella
is fashion my Passion? the MiriamStella's Blog
MY FACEBOOK FAN PAGE CLICK HERE
I really love your blog!
ReplyDeleteKeep posting dear!!
XX
Thank you :)
Deletethis is so cool! i will definitely try this! thank you!
ReplyDeleteLet me know how it goes! :)
DeleteI love it! I'm so going to try it, thanks so much for the tutorial!
ReplyDeleteYou are so welcome! Would love to know the result :)
DeleteYou are so crafty! I love that bracelet!!
ReplyDeleteThanks so much, Karen! :)
DeleteThanks for sharing. Love this! I'm definitely going to (try to) make one, but with navy and white rope only to make it super nautical. It'll be perfect to wear on Cape Cod this summer! Thanks again!
ReplyDeleteWhy are all your tutorials amazing?? :) Gonna try this and the crocheted necklace!
ReplyDeleteYou are so sweet - thanks so much!
DeleteI love this tutorial! I am having the hardest time finding the ropes. Do you have any suggestions for ordering them online?
ReplyDeleteHi Michelle! You can generally find them with search term "cord" - here's some from Amazon: http://www.amazon.com/s/ref=lp_12899361_nr_n_2?rh=n%3A2617941011%2Cn%3A%212617942011%2Cn%3A12899091%2Cn%3A12899361%2Cn%3A12899421&bbn=12899361&ie=UTF8&qid=1364195453&rnid=12899361
Delete